Design & Testing
High-Level Design
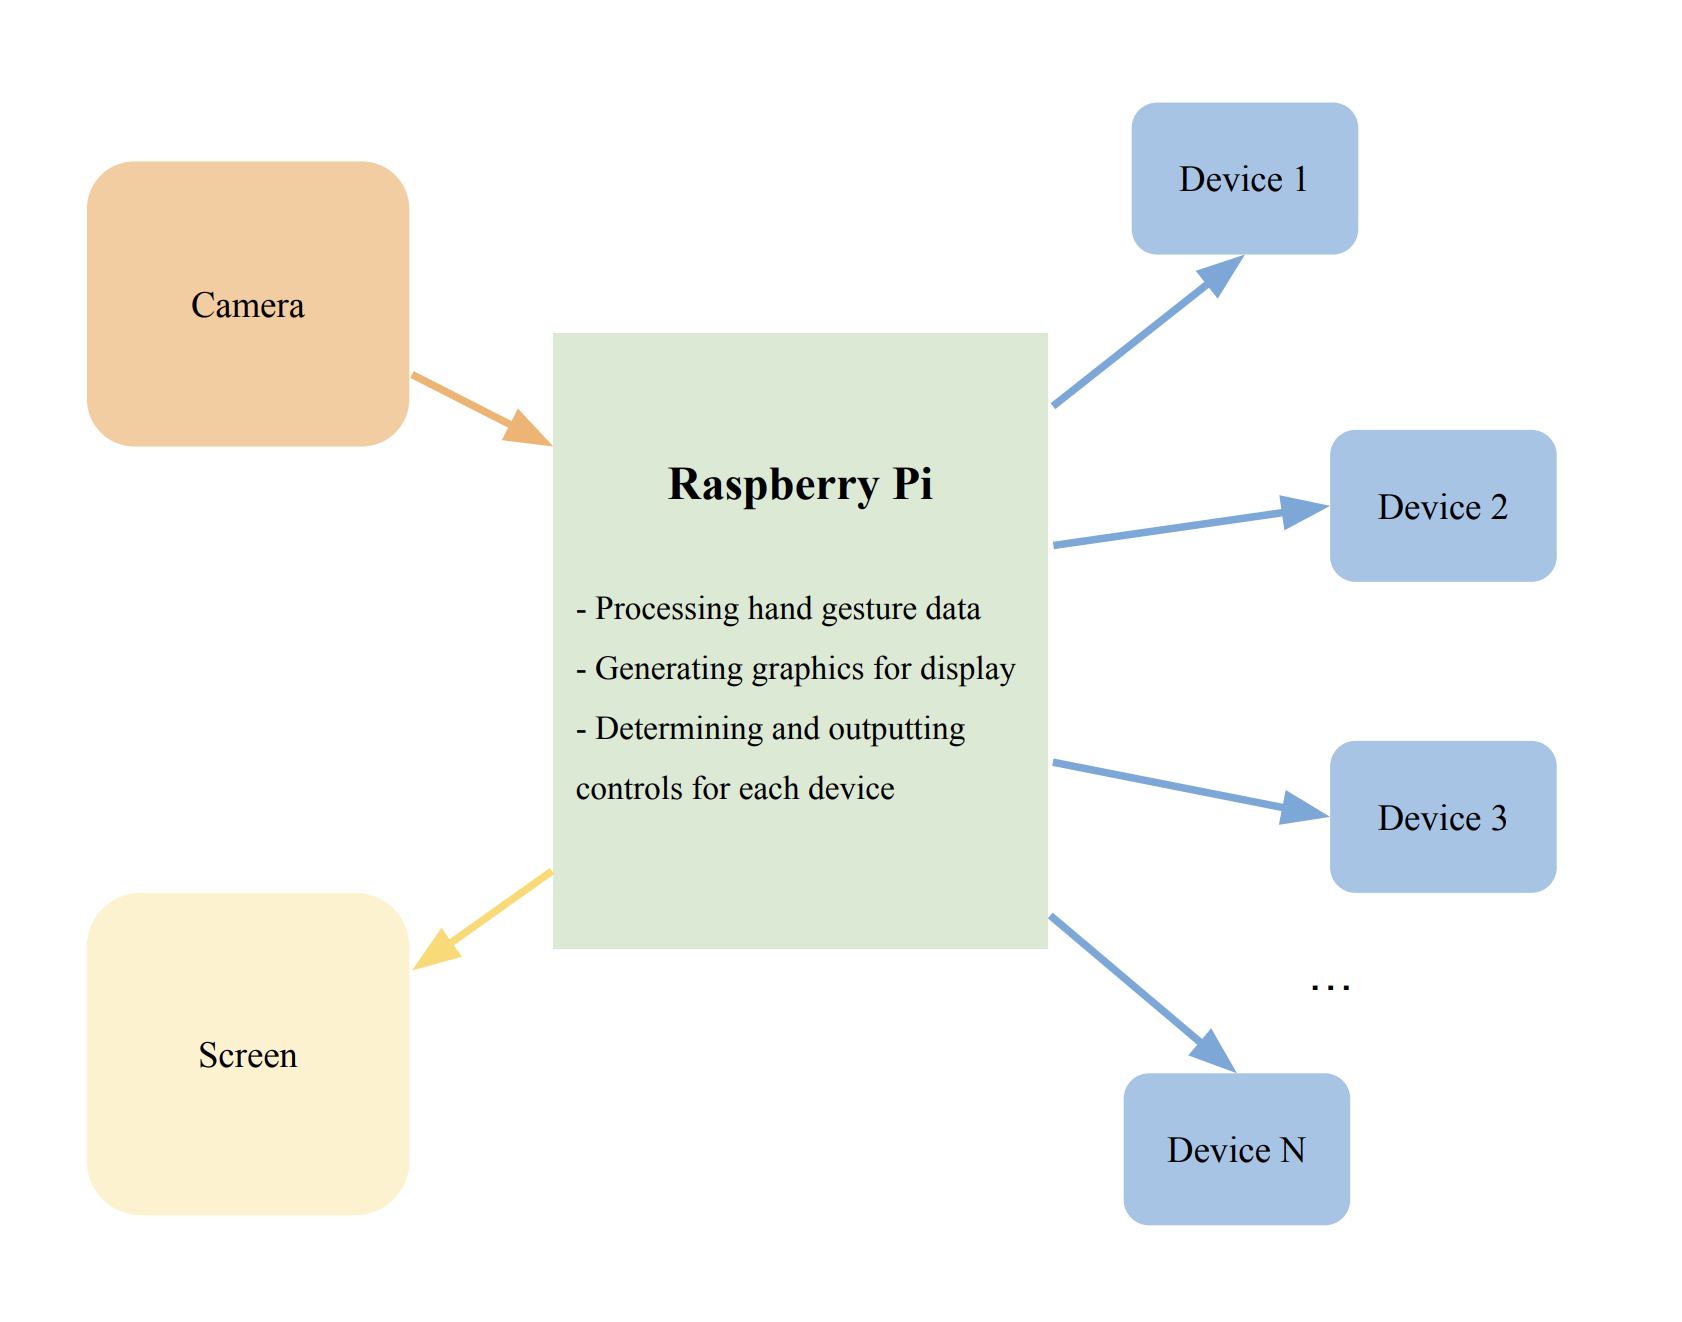
Figure 1: High-Level Design
Setting Up The Environment
1. Camera
We began our developmental process by setting up the camera. We accessed the Raspberry Pi configurations by using the 'sudo raspi-config' command, which allowed us to enable the use of the camera interface. After that, we connected the camera module by inserting the camera ribbon cable into the Raspberry Pi's camera port. Finally, we created a simple test camera code in Python to check if everything was working smoothly.
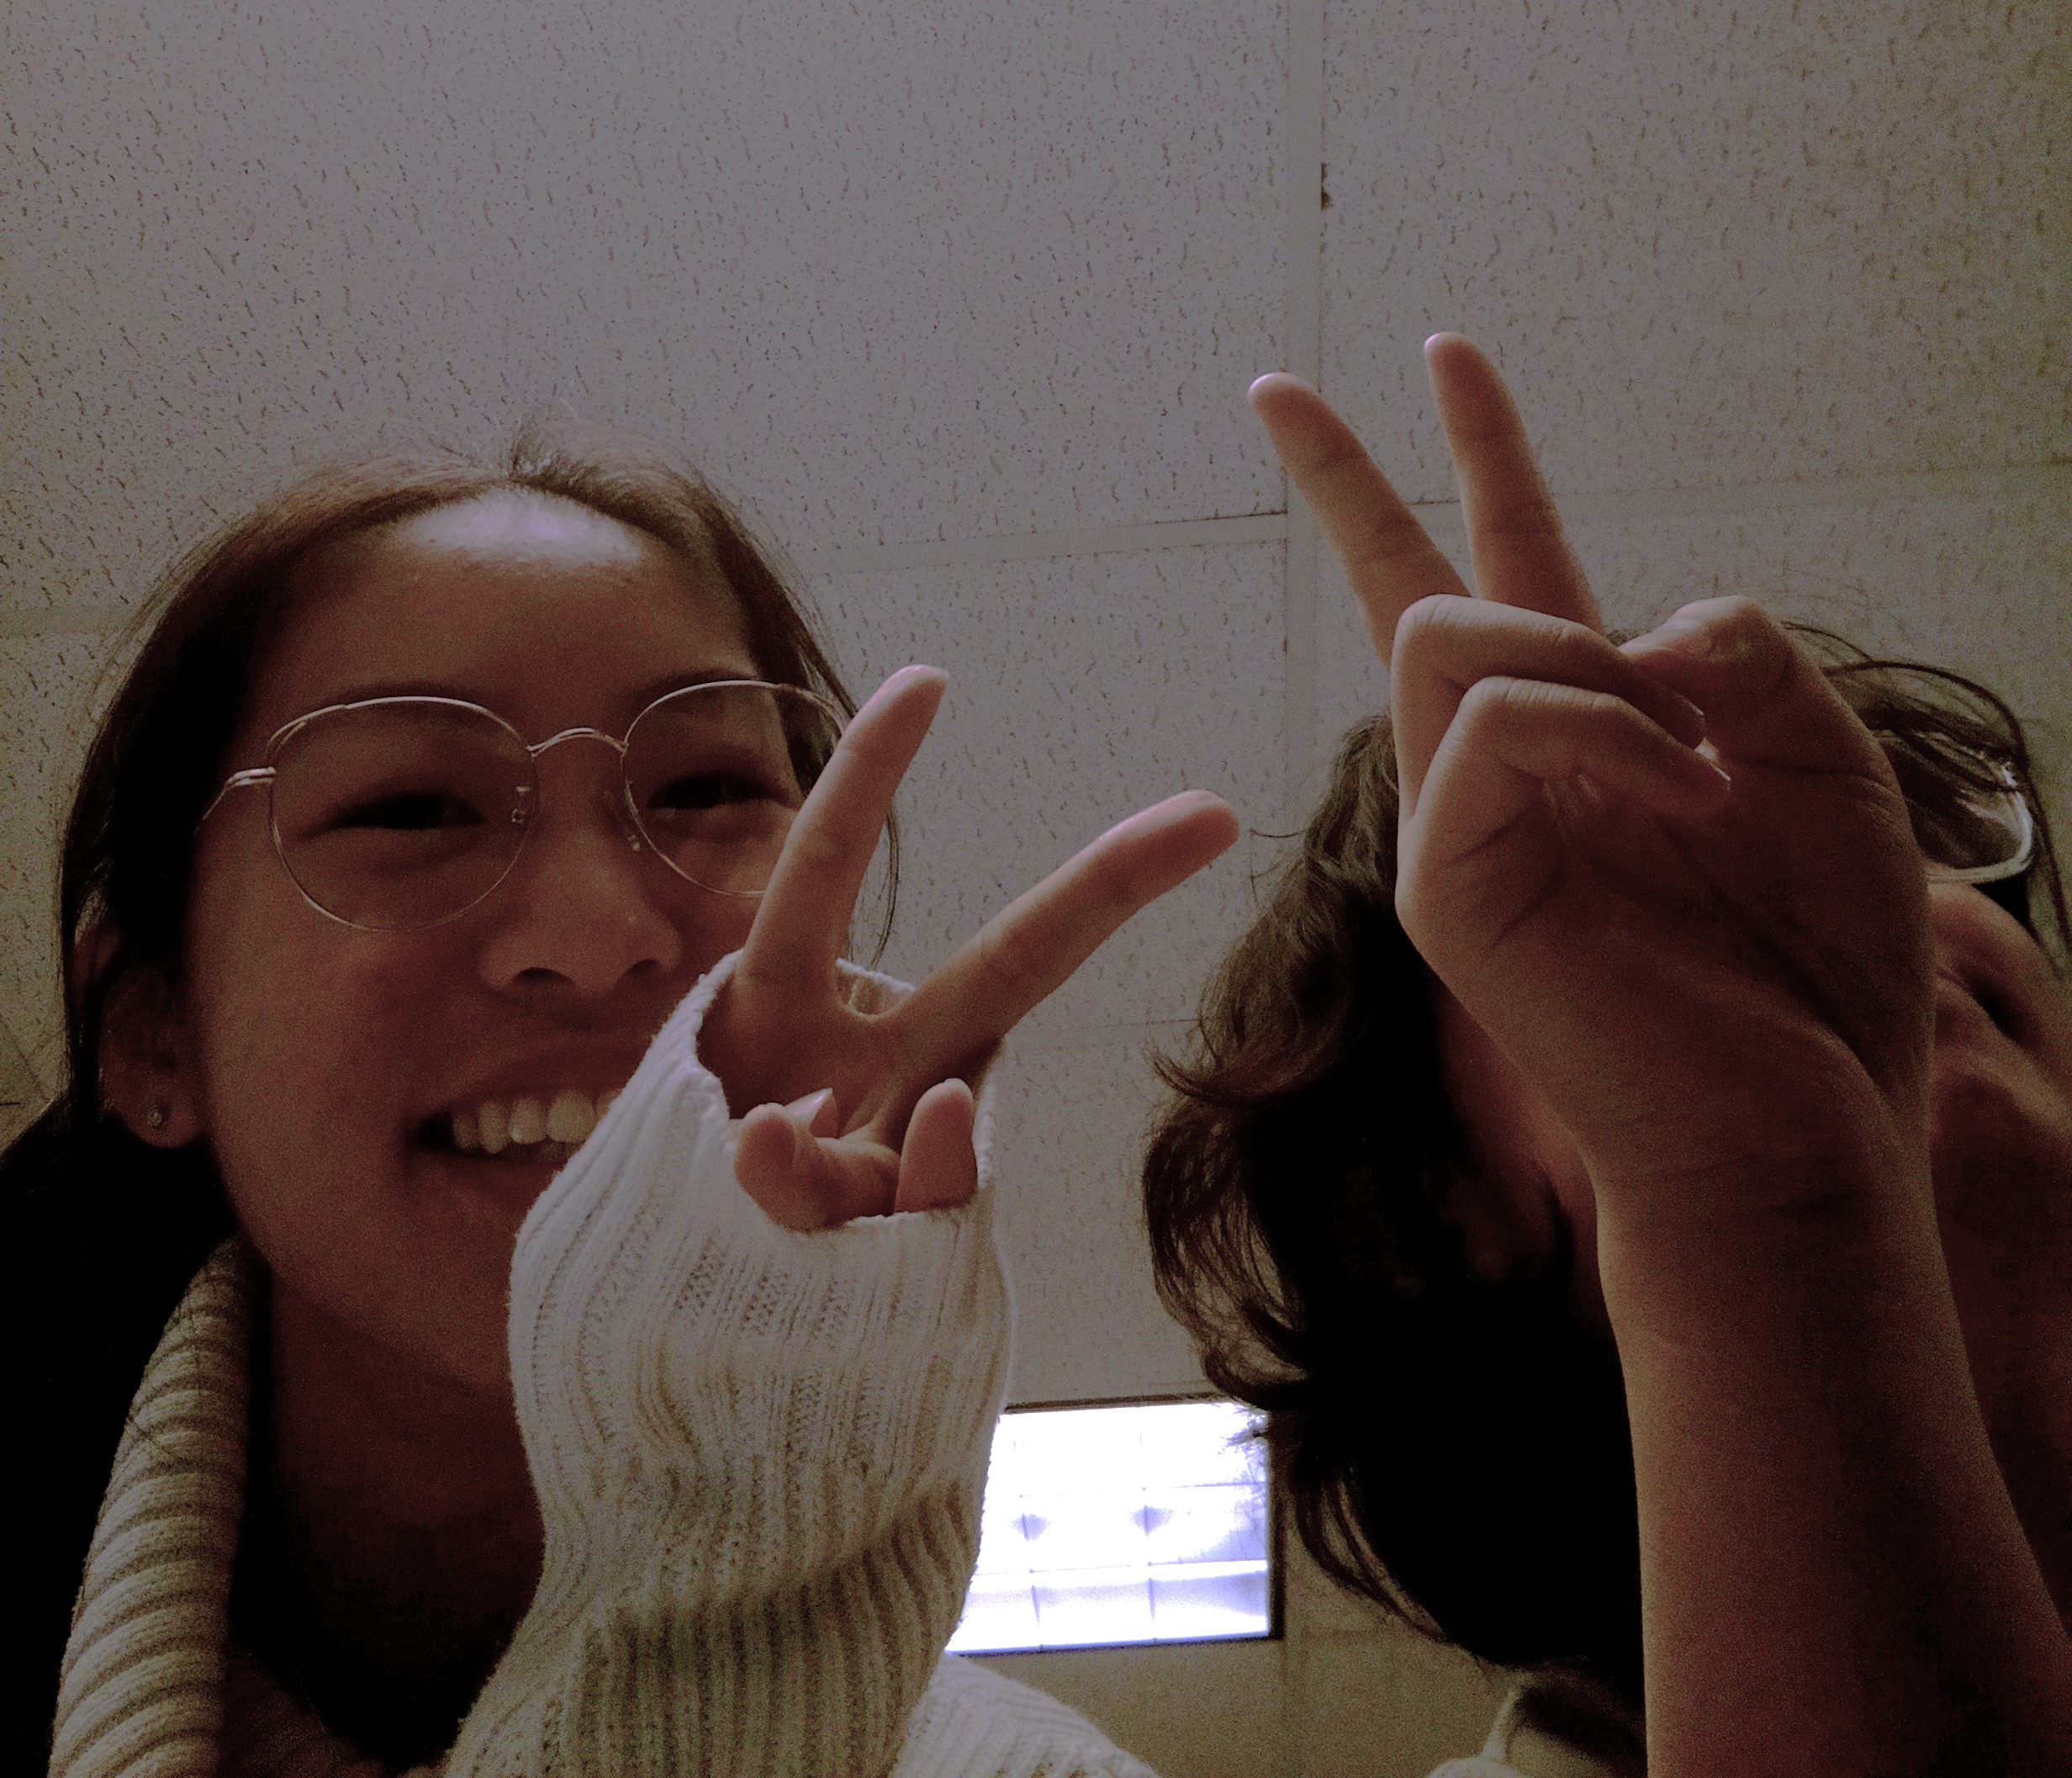
Figure 2: Our first picture captured on the Raspberry Pi!
2. Choosing OpenCV & Mediapipe
After confirming that the camera works, we then moved on to setting up the Raspberry Pi 4 to create an environment that could enable us to create hand gestures. To implement the hand gestures, we decided to use the OpenCV library. Initially, we tried installing it using the command 'pip install opencv-python'. However, we later learned that the installation process was too long - around 3 hours. Therefore, we used a different command to install the pre-compiled version of OpenCV - 'sudo apt-get install python3-opencv'.
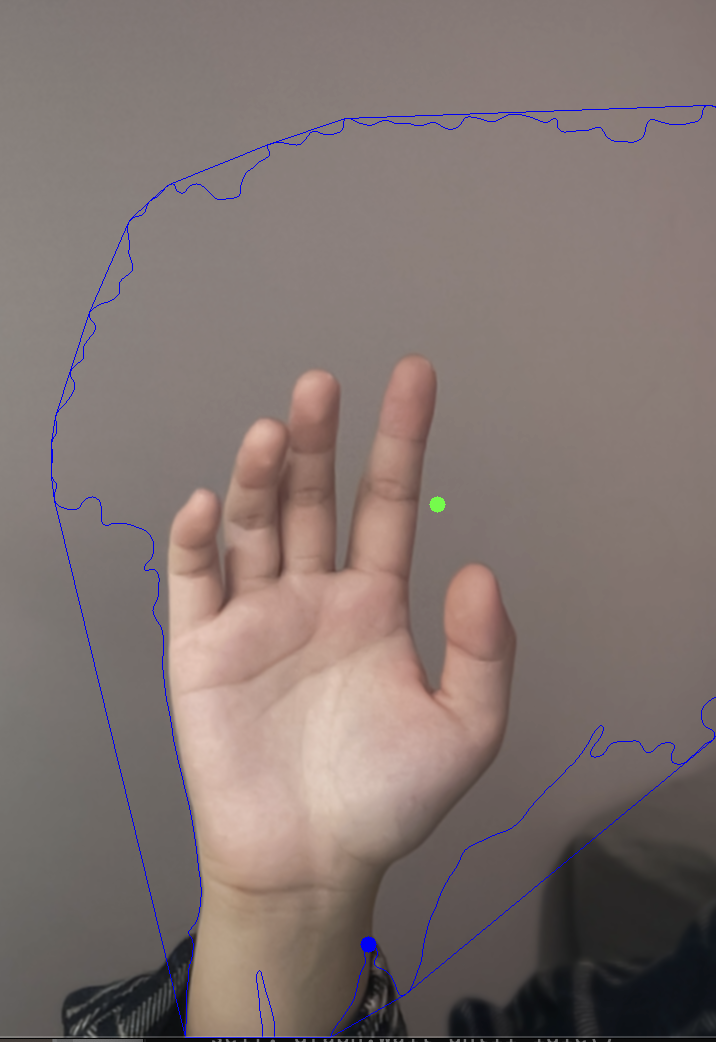
We conducted tests to check the hand detection using only the OpenCV library. However, we were not satisfied with the results we obtained as it was unstable and unreliable. Sometimes, it would detect a hand that didn't exist in the background or not accurately identify the index finger and return a broad outline of our hands. This led us to do further research on how we could improve hand detection accuracy. We eventually found and tested the MediaPipe framework on our laptops, which provided us with stable, reliable, smooth, and high-accuracy hand detection. Thus, we decided to proceed with implementing both the OpenCV and MediaPipe frameworks on the Raspberry Pi.
|
|
Figure 3: Using CV2 (left) vs MediaPipe (right) for the hand tracking.
We installed MediaPipe on the Raspberry Pi using the command ‘sudo python3 -m pip install mediapipe’. We tried using the MediaPipe packages; however, we encountered many errors, including missing paths and unidentifiable files. We attempted to reinstall the framework in hopes that it was simply an installation error, but this did not solve the problems. After spending two weeks trying to figure out why MediaPipe does not work, the Professor informed us that another group (jl4254) also using MediaPipe recently found out that we needed to downgrade our Raspberry Pi from Debian Bullseye to Debian Buster.
To downgrade to Debian Buster, we installed the 2021-05-07 version of Debian Buster's image and wrote it onto the SD Card. Once the image was successfully written, we proceeded to set up the configurations and install any missing libraries. After completing the setup, we tested the code that was previously working on our laptops on the Buster version of the Raspberry Pi. We were pleased to observe that MediaPipe was functioning correctly and our code was running smoothly with precise detection of hand gestures.
Hardware Connections
For our smart home, we chose to connect hand gesture detections to control three home automation systems: lights, a music player, and a fan. We created each system individually without using hand detections to make sure the system itself was performing as expected.
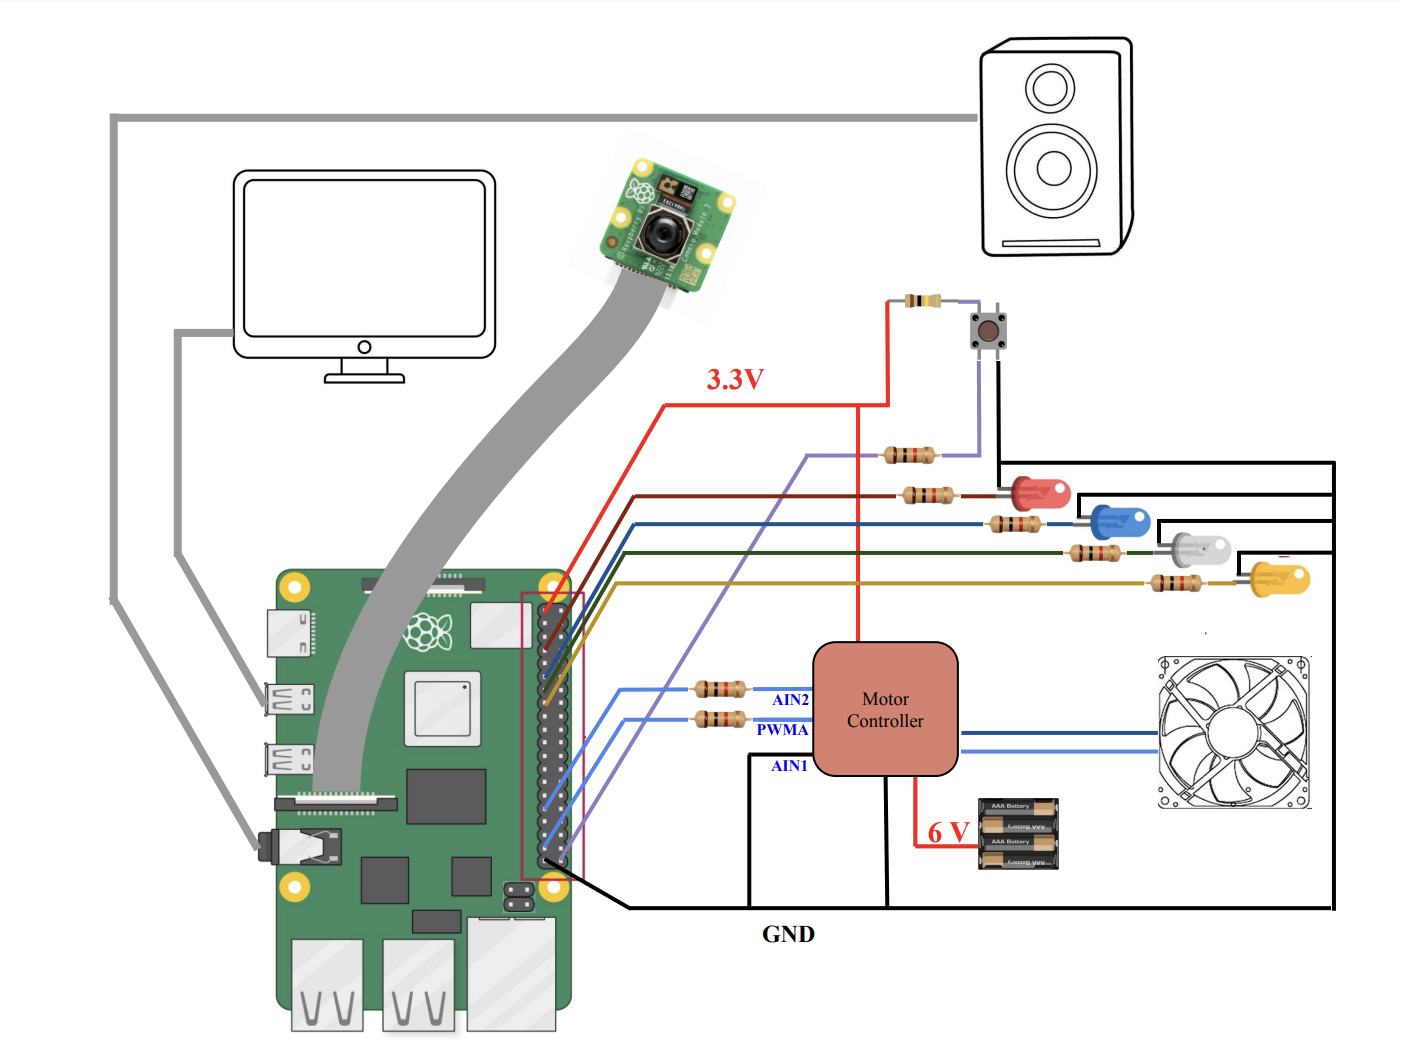
Figure 4: Hardware Connections
1. LEDs
We used four LEDs in our Raspberry Pi model to represent the lights in our home, and the GPIO connections are:
LED Color |
GPIO |
Pin |
|
Red |
4 |
7 |
|
Green |
27 |
13 |
|
Blue |
17 |
11 |
|
Yellow |
22 |
15 |
The features of the four LEDs include powering on, powering off, and adjusting brightness. In order to enable the full range of features for the four LEDs, we have assigned each LED a unique frequency value, duty cycle value, and GPIO.pwm instantiation. To turn on an LED, we start the PWM with a duty cycle of 100. Conversely, to turn off an LED, we start the PWM with a duty cycle of 0. To adjust the brightness, we have implemented a temporary code that controls the duty cycle of each LED, allowing us to increase or decrease the brightness as needed. This ensures that our LEDs are fully capable of adjusting brightness as required.
2. Fan
We chose to use a DC motor fan to represent the air system in our smart home. The user is able to turn on and off the Fan and adjust its speed. To precisely control the speed of the motor, it requires a motor controller to adjust the amount of voltage applied using the PWM signal from GPIO 6. We conducted experiments to optimize the control parameters for the fan. A higher duty cycle would increase the average voltage applied to the motor, resulting in a higher speed. We found out that when the duty cycle is set above 15%, the fan operates at a speed that might be considered too fast for typical home use. Therefore, to ensure a safe and comfortable operation, we set the PWM signal to a constant frequency of 150 Hz while restricting the duty cycle within the range of 0% and 100%.
3. Speaker
The music player has five features, including play, pause, skip, previous track, and volume control. To use the player, we downloaded six songs externally and stored them in a designated folder. We implemented all of the features using the pygame.mixer.music module. During testing, we mapped the features to specific keys for ease of use, such as using the spacebar for play/pause, up and down arrows for volume control, and left and right arrows for skipping tracks. To further enhance the player's functionality, we also programmed it to automatically play the next song when the current one finishes, and play the first song when the last one finishes.
4. Shutdown Button
We integrated an external shutdown button using GPIO 21. When it is pressed, we use the subprocess module to send the command 'sudo shutdown -h now' to the terminal.
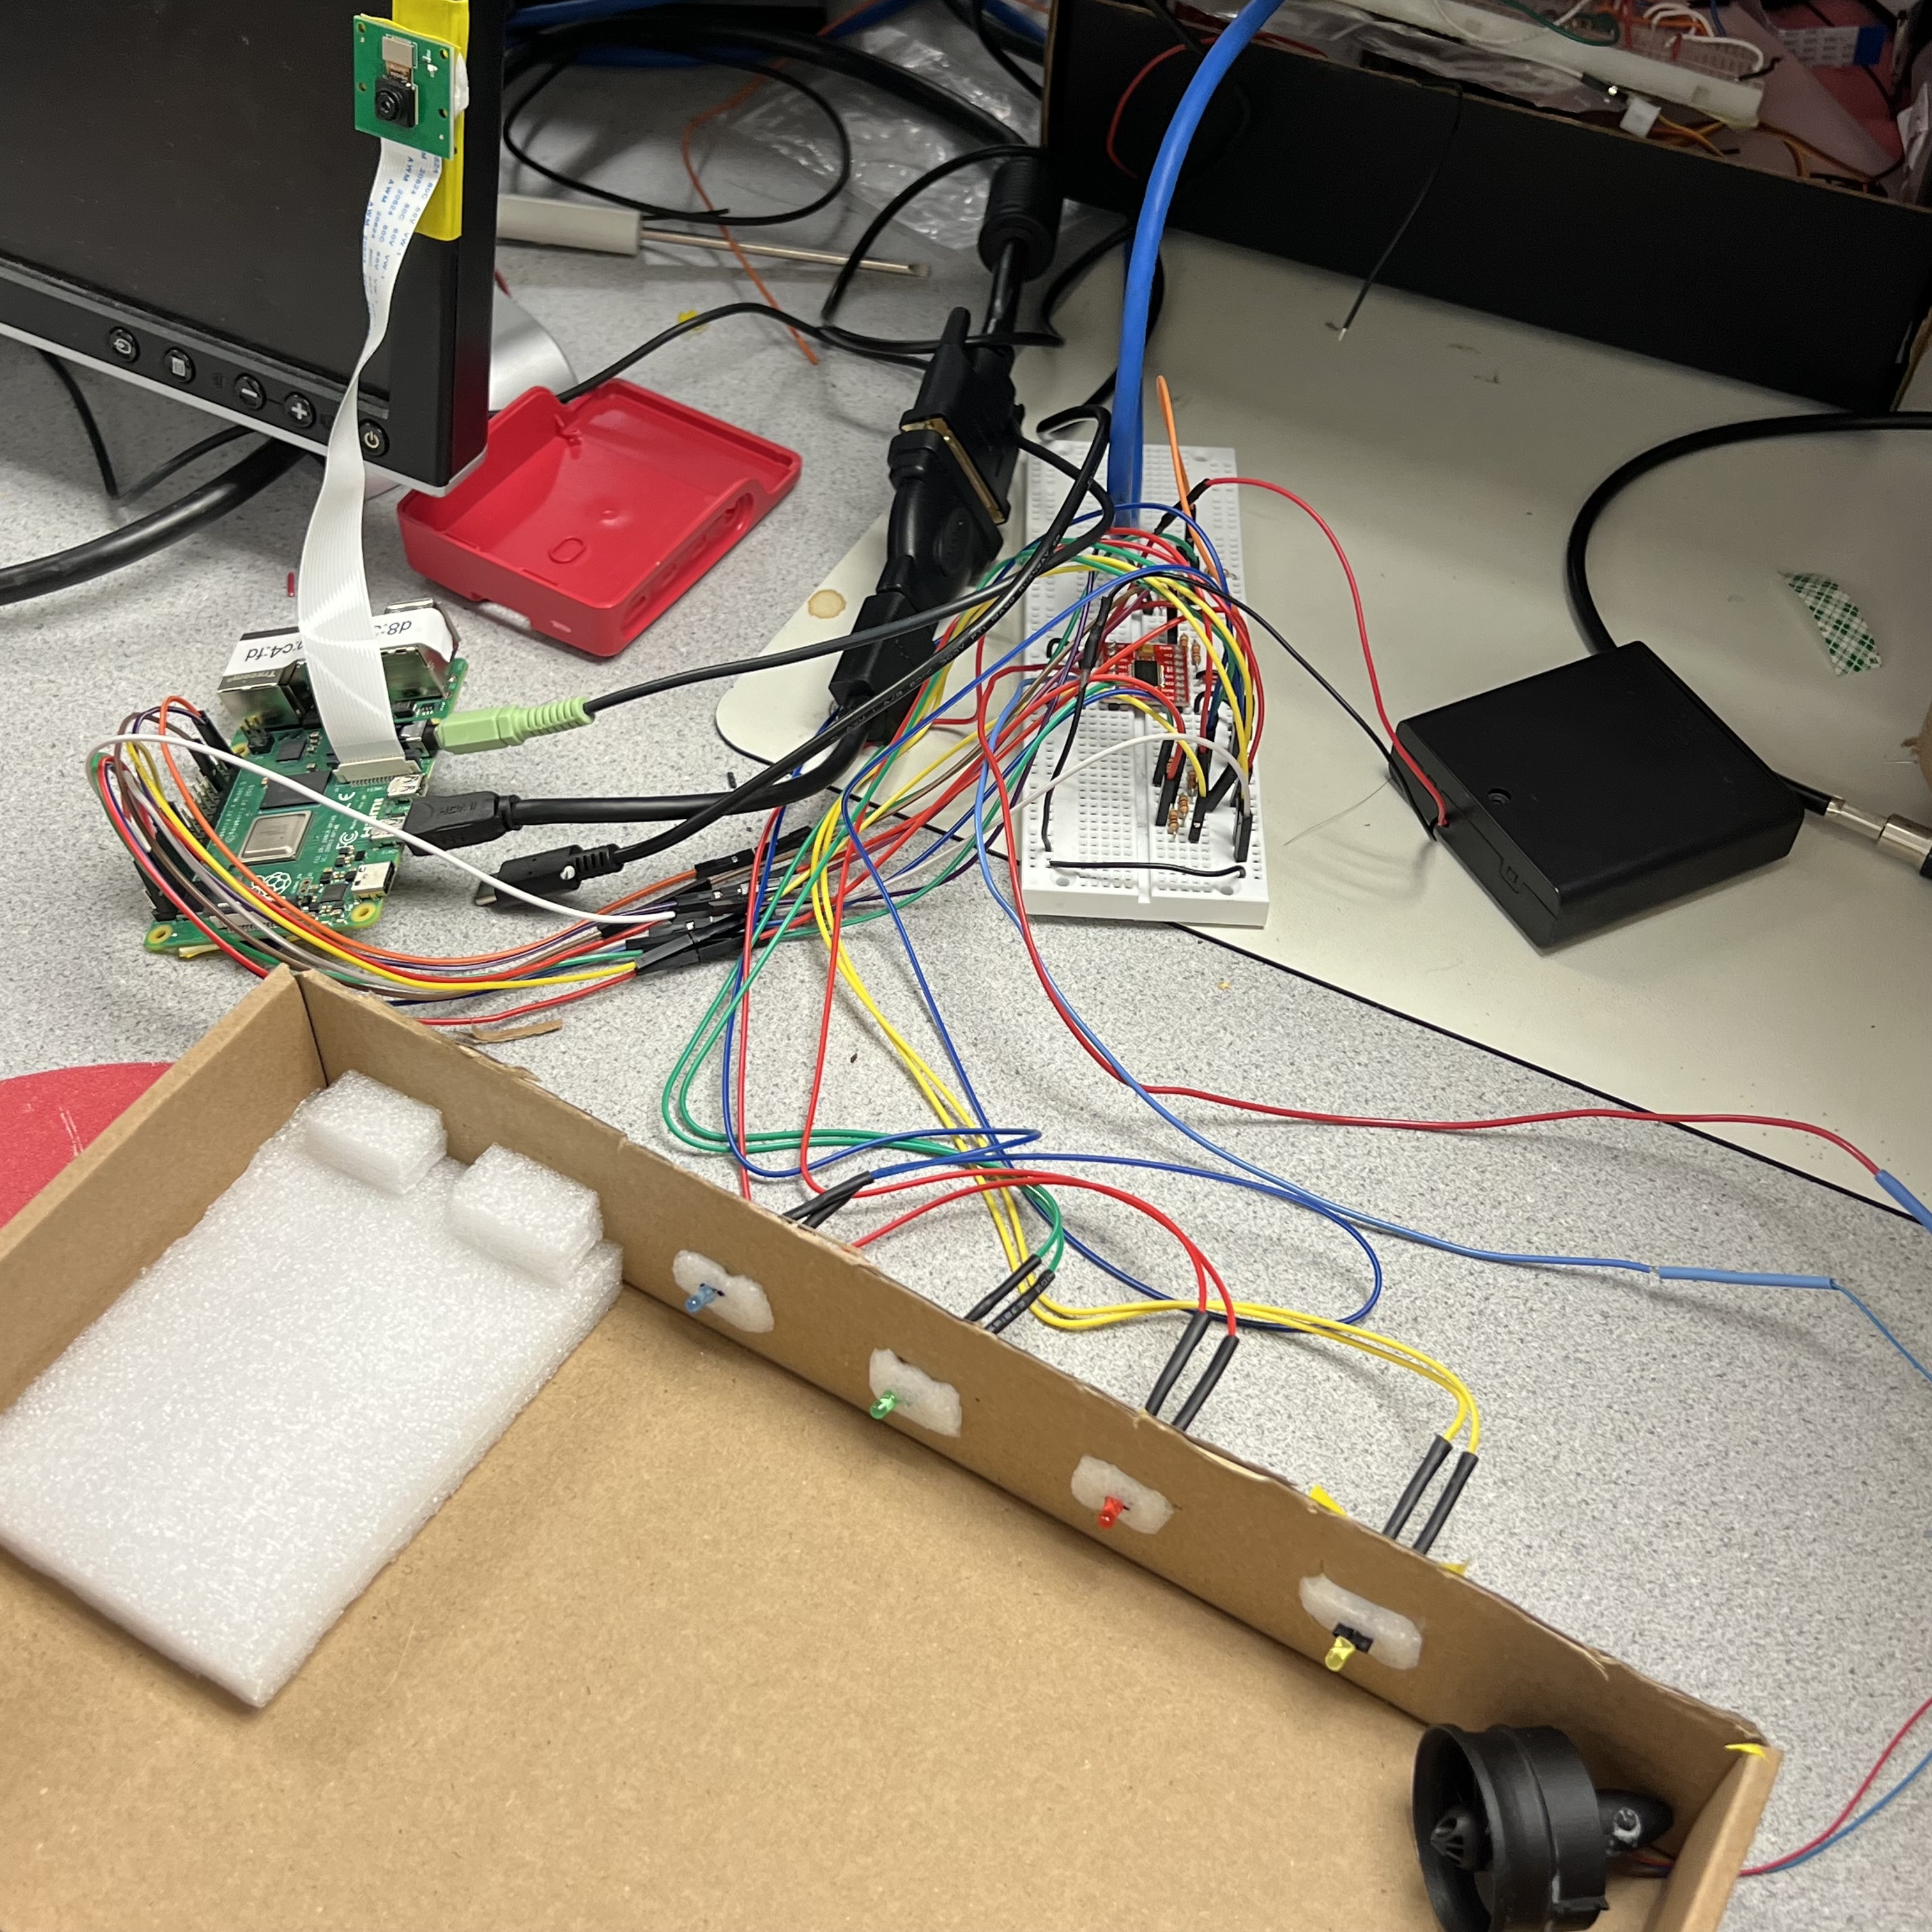
Figure 5: Final Hardware Connections
Creating The Menu
1. Initial Designs
Our main goal was to create a user-friendly interface that is easy to navigate. To achieve this, we implemented a navigation bar located at the top of the menu. The navigation bar changes depending on the page you are on, making it easier for users to access the features they need. We designed a total of seven pages, including the main page, tutorial, controlling the LED power, setting LED brightness, speaker control, song list, and controlling the fan.
In addition to ease of use, we also considered hand gestures while designing the interface. We ensured that there was ample space for hand movements and that it was not possible to misclick anything accidentally. We meticulously planned and drafted the pages to ensure that the end product was simple, intuitive, and user-friendly.
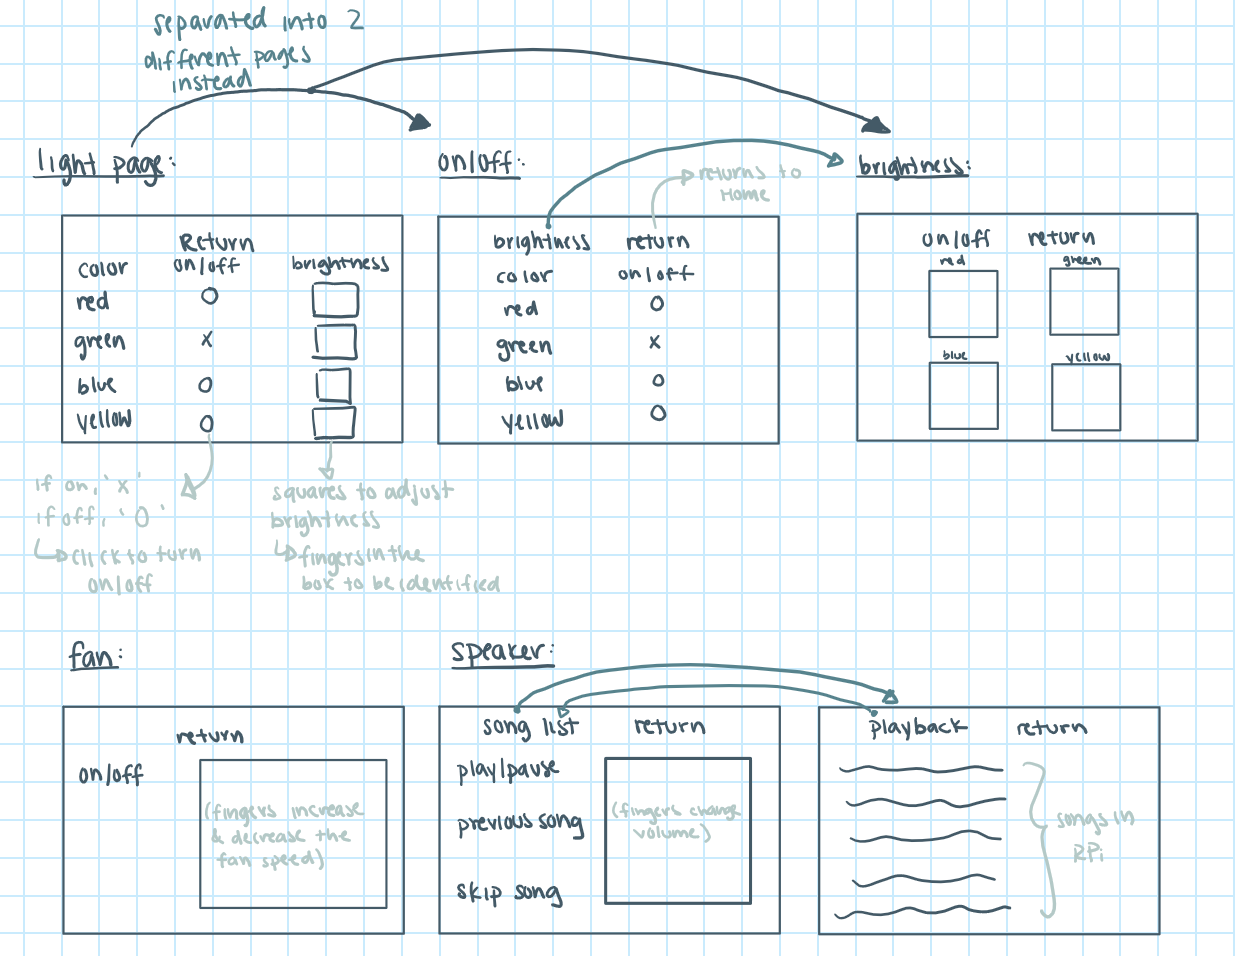
Figure 6: Initial Menu Designs
2. Final Designs
Initially, we used OpenCV's CV2 module to implement all of our designs. This was incredibly helpful for drawing shapes, writing text, and displaying the menu as a whole. However, while setting up crontab, we discovered that CV2 was not able to draw on the monitor. Remembering that we were able to display drawings with Pygame from Lab 3 using crontab, we decided to convert our CV2 drawings to Pygame. In the end, we successfully used both CV2 and Pygame to display our final design upon reboot with crontab.
Creating The Hand Gestures
1. Index Finger Tracking
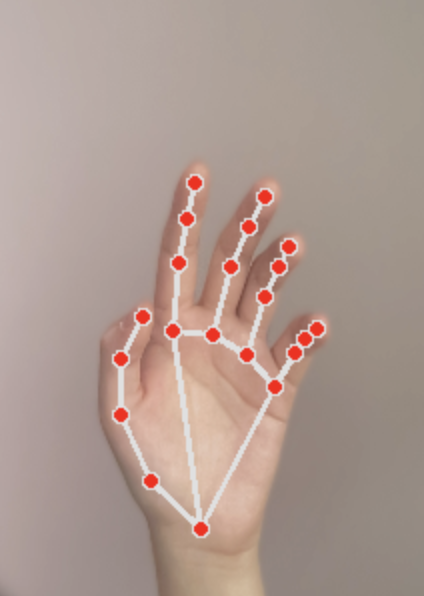
To track the position and gesture of the hand, we used external libraries including CV2 and MediaPipe to detect the landmarks of the hands in an image. The hand landmark model in MediaPipe can pass the image data to a machine learning model and outputs the key points of hands in image coordinates as well as the handedness (right / left). It can detect 21 hand-knuckle coordinates listed in the figure below. In our project, we were more interested in point 8 and 4, which corresponds to index and thumb fingertips.
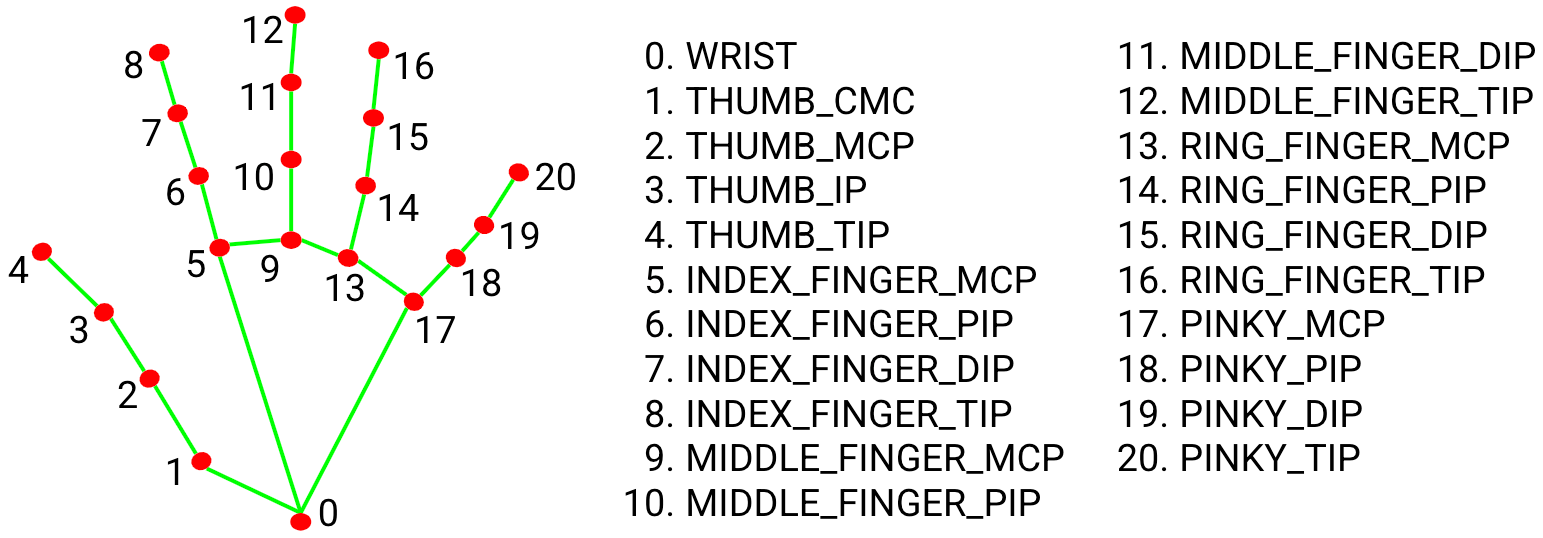
Figure 7: Hand Landmark Coordinates
We started by testing the coordinate return of the index finger tip. Mediapipe returns landmarks in normalized coordinates, where the x and y values range from 0.00 to 1.0, representing the relative position within the frame. A normalized coordinate of (0.5, 0.5), for instance, corresponds to the center of the frame. To convert normalized coordinates into pixel coordinates suitable for visualization on the screen, ‘drawingModule._normalized_to_pixel_coordinates’ is employed. It takes the normalized x and y coordinates, along with the dimensions of the frame, and translates them into pixel coordinates within the specified frame size. We verified the correctness of pixel coordinates by printing out the data on the terminal and visually inspect the coordinates aligned with the expected values.
2. Clicking
Initially, our system was designed using hand gestures to signify a click action on the menu. If only the index finger is raised, the system exclusively tracks the coordinates of the index finger tip. This allows users to navigate or hover over menu options without triggering an action. If both the index and middle fingers are raised, we interpret this gesture as a click action. In this scenario, we trigger an event at the coordinates corresponding to the tip of the index finger. This design decision is made to provide users with an intuitive way to interact with the home control system.
In our code, we compared the y-coordinates of each finger tip with the y-coordinates of the corresponding joint. If the finger tip is higher than the joint, it is considered “up.” The click will be triggered if both index and middle fingers are detected as “up.”
We conducted thorough testing of the click action feature on our own local laptop, and the functionality performed smoothly and without issues. However, when we extended our testing to the Raspberry Pi, we encountered a noticeable delay in the execution of the click action. This delay was primarily attributed to the constrained computational efficiency of the Raspberry Pi compared to our local laptop. To optimize hand-tracking efficiency for a better user experience, we decided to remove the two-finger detection algorithm from the system. We modified our system to automatically trigger a click action every 2 seconds. This timed approach improved delay by 23% percent. On the other hand, by adopting this timer-based click mechanism, we simplify the user control experience. In the previous two-finger-up design, the position of the index finger can unintentionally shift when the middle finger is raised to trigger the click. This is because our hand mechanism involves interdependent movements of adjacent fingers. It’s difficult for users to consistently and accurately trigger the correct button for two-finger-up detection. Users might experience frustration and the need for multiple attempts to successfully execute the desired gesture. Therefore, using one finger for a timed click simplifies the user experience and makes it easier and more accessible for individuals to interact with the system.
3. Slider Control
To implement control over speed, volume, and brightness, we used the measurement of the distance between the tips of the index finger and thumb. We tracked the coordinates of both the thumb and index fingertip through mediapipe hand module. The distance between the tips of two fingers is continuously measured in real-time. This is achieved by calculating the Euclidean distance between the respective landmark points. The measured distance is then mapped to control parameters such as speed, volume, or brightness. A shorter distance corresponds to a lower speed, volume, or brightness, while a longer distance could indicate an increase in these settings.
4. Pipe Communication
We initially used multiprocessing. Pipe to communicate data between the hand tracking module and the menu module for better management of the system. We defined a structure ‘(1, (x, y))’, where the first element ‘1’ indicates a click event (0 if no click), and the second element (x, y) denotes the associated coordinates. The hand tracking shares this formatted data through pipe in every frame, providing the menu module with real-time updates for click events and coordinates.
The communication pipeline worked perfectly fine on our own laptop, but during testing on the Raspberry Pi platform, a notable conflict happened between the pipe and the cv2 camera capture. The camera failed to capture the frame when the pipe was active. Interestingly, the issue was resolved when the pipe was removed. This unexpected conflict may be related to concurrency or the interplay between multiprocessing operations and camera capture. As a result, we have made a strategic decision to integrate hand tracking and menu into one module to eliminate the need for a communication pipe.
5. Tuning and Performance Testing
To achieve optimal hand-tracking accuracy and performance, we fine-tuned several key parameters in the configuration of the Hand Landmark model. Specifically, we adjusted the following parameters to enhance the overall reliability and efficiency of our system:
max_num_hands
We set the maximum number of hands detected by the model to 1 (previously it was set to 2). By limiting the system to recognize a single hand, we significantly improved computational efficiency and resulted in a notable performance boost of approximately 180%.
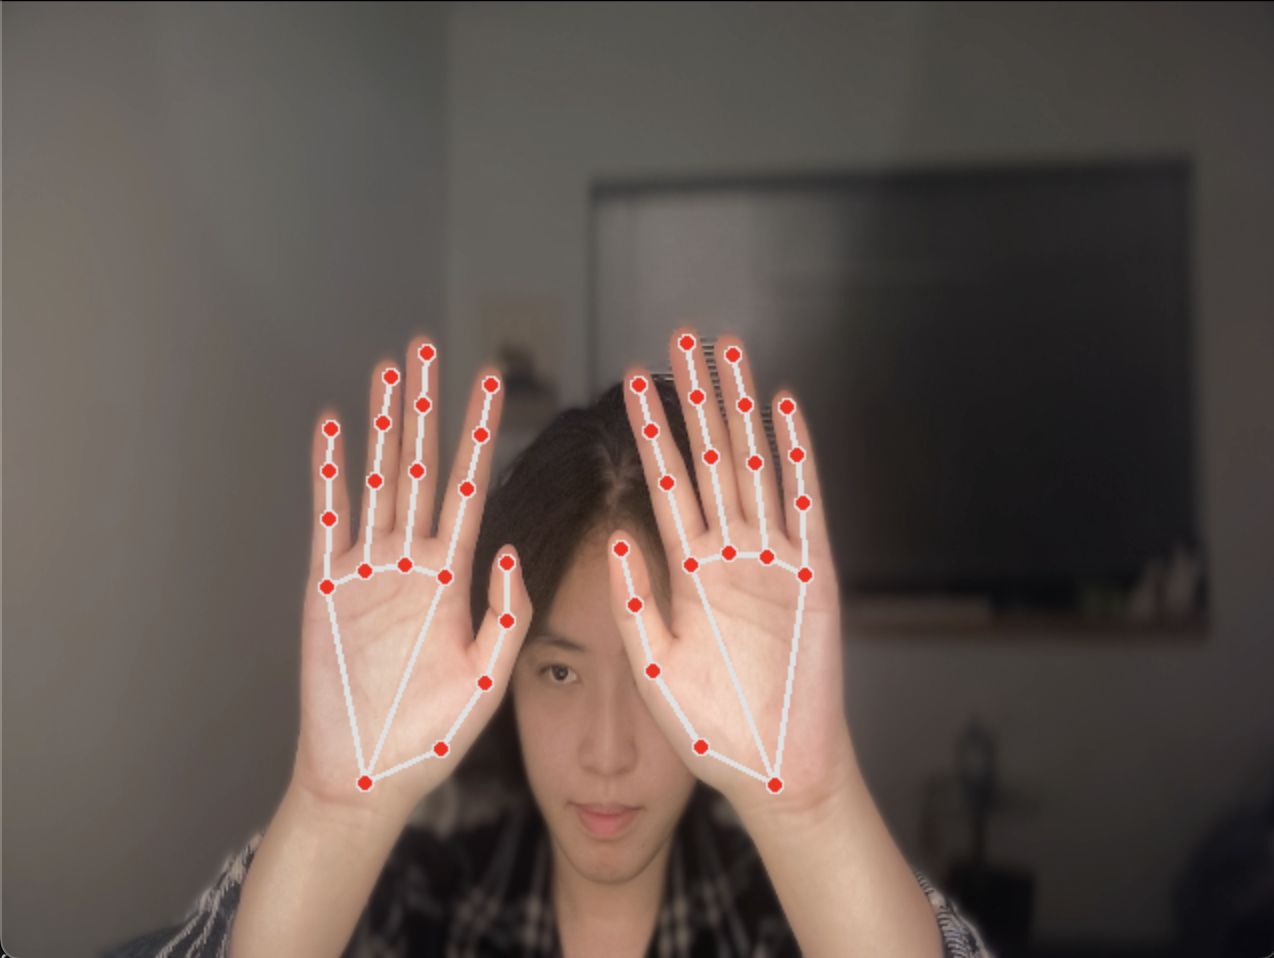
|
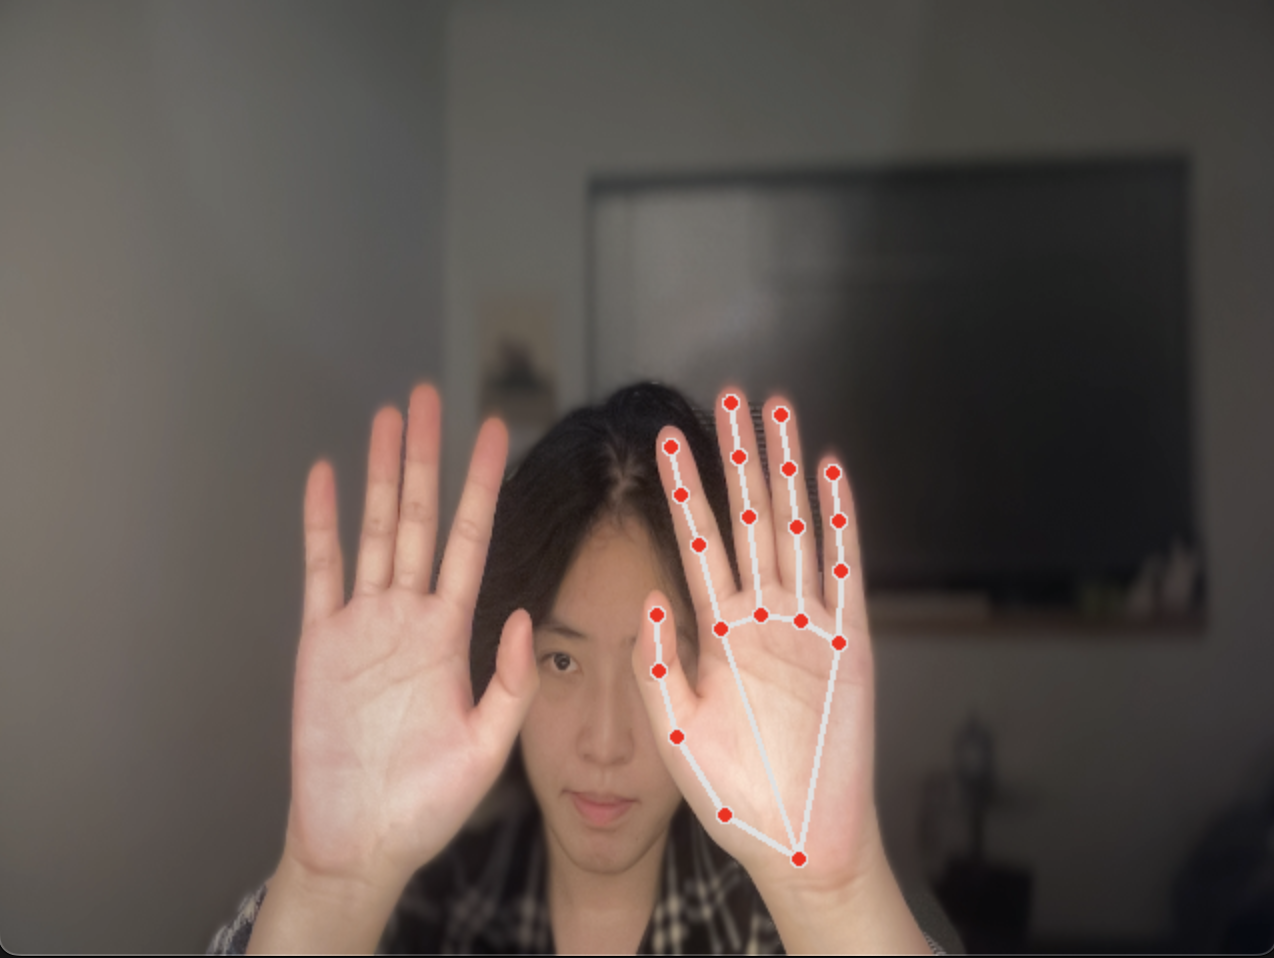
|
Figure 8: Reducing the number of hands being detected
min_detection_confidence
This threshold represents the confidence level required for successful palm detection in a model. At a low min_detection_confidence, the system will attempt to detect hands in every frame at a low confidence level associated with the detected hand. This will increase false positives as the system becomes more permissive in accepting detections. If the confidence level is set too high, it can lead to more conservative hand detection and cause the system to miss valid hand instances. To ensure robust hand detection, we set the minimum confidence level to 0.8.
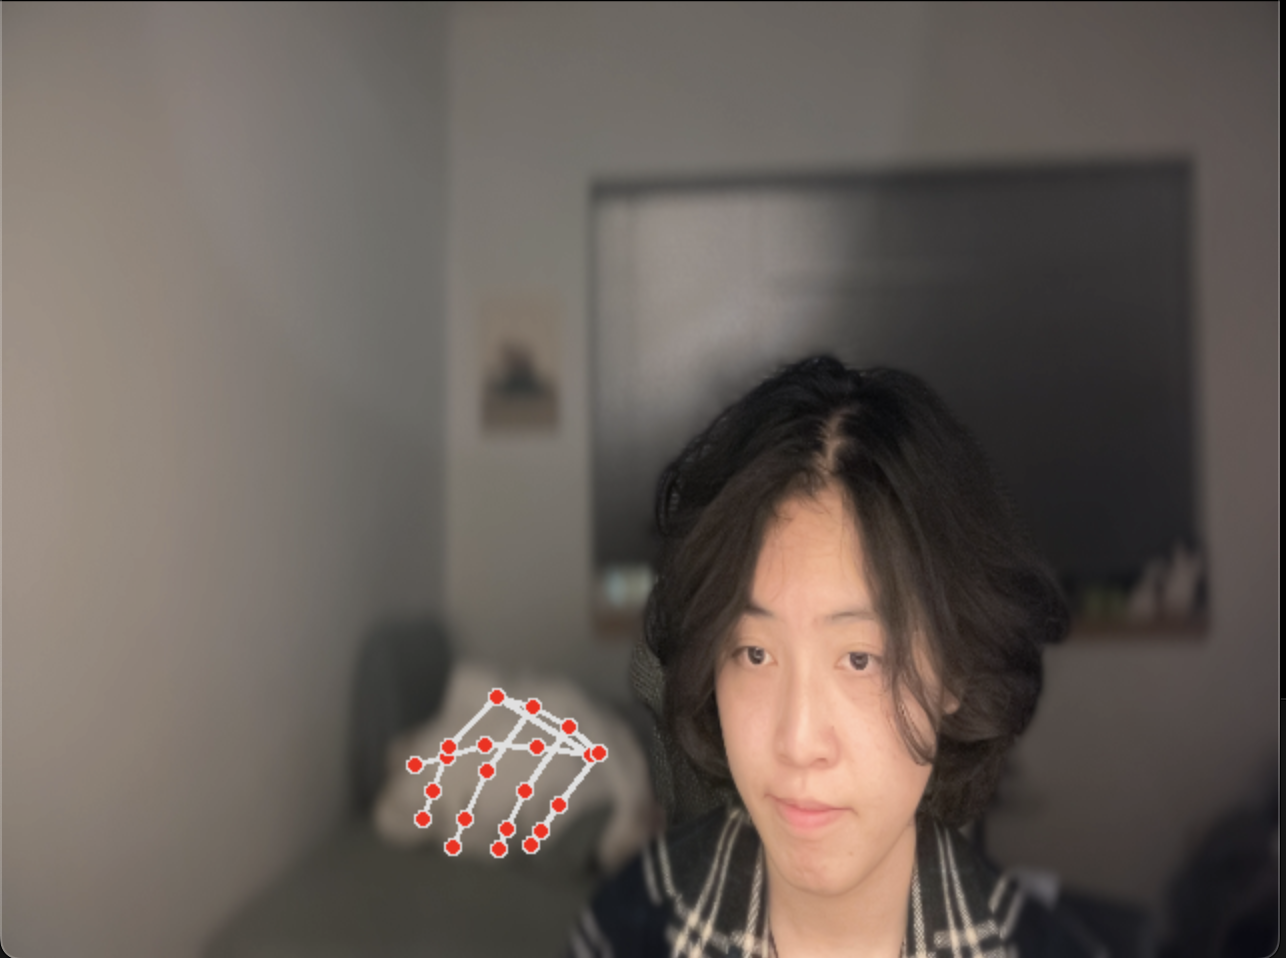
Figure 9: Hand Tracking Module False Detecting Background at Low min_detection_confidence
min_tracking_confidence
This threshold represents the bounding box IoU threshold between hands in the current frame and the last frame. If the confidence is set too low, other objects other than the hand could be accepted as a valid tracking result. This can lead to increased sensitivity to noise and may result in the system tracking false positives or inaccurately tracking hand positions. To maintain accurate hand tracking, we tuned the minimum confidence score for tracking to 0.8.
Choosing Frame Size
The choice of the frame size of 640*480 pixels provides a balance between speed and accurate identification in the hand-tracking process. A smaller frame size generally leads to faster processing times due to fewer computational resources, which contributes to a higher frame rate and more efficient hand-tracking operation. However, a too-small frame size may not provide sufficient details for accurate hand tracking.
Integrating Menu, Hand Tracking, and Devices
After successfully creating functioning home systems, menus, and hand gestures that ran individually, the next step was to integrate them to run together. To achieve this, we used our laptops to do all of the integration. Our first attempt was to combine menu navigation with hand gestures using the pipe module that linked our two files. The integration was perfect and running smoothly on our laptops. However, we encountered a problem when we tested the same code on the Raspberry Pi. The processor of the Raspberry Pi was much slower, resulting in a delay of 3 seconds from the time our hand physically moved to the MediaPipe hand outline. Realizing the need for adjustments, we changed our integration method from using the pipe module to using only one file and implemented all the home systems in the same file. We also adjusted the camera FPS to 5, which finally led to the smooth running of our integration without any delays.
Loading at Reboot
At this stage of our project, we have consolidated all the code for the menu, hand detection, hand outline, and home system controls into a single file called ‘final.py’. Initially, we tried to run this file at reboot using crontab and a bash script. We made sure that all the paths called in ‘final.py’ were renamed to start from ‘\home\pi’ and that the bash script ran from ‘/tmp’. We even turned on ‘Console Auto-Login’ in the Raspberry Pi configurations to avoid the need for logging in at reboot. However, despite all our efforts, we were unable to run the code on reboot.
So, we decided to modify /.bashrc to run the Python file directly at reboot. This method worked, but we faced another issue - we couldn't play sound and run the media player simultaneously. It turned out that the media player had to be run without using sudo, while our current ‘final.py’ required sudo to run. To resolve this, we created another Python script to separate the audio player process and the remainder of the ‘final.py’ process. The first process ran without sudo, while the second process ran with sudo. We were able to get the two processes to communicate with each other using a text file. In ‘final.py’, we wrote the instructions, including ‘pause’, ‘play’, ‘next’, ‘prev’, and volume, to the text file. In ‘speaker.py’, it read the last line of the text file and executed the instruction.
After making all these changes, we were finally able to successfully start running our home gestured home automation system on reboot.